
If you've ever published a new page, built a backlink, or launched a new website and wondered why it wasn't showing up on Google -this guide is for you.
EasyIndexer is a website indexer tool that does one thing really well: it tells Google your URLs exist and signals it to crawl them fast. No Search Console setup, no complicated configuration, no waiting weeks for Google to find your pages on its own.
In this guide you'll learn exactly how to use EasyIndexer from start to finish - from creating your account to checking your indexing results.
What Is EasyIndexer?
EasyIndexer is a submit URL to search engine service that takes your URLs and pushes them through a professional indexing infrastructure. Instead of waiting for Google to stumble across your pages, EasyIndexer actively signals Google's crawlers to visit and index them.
It works on any URL - your own pages, backlinks on other people's sites, press releases, directory listings, anything that's publicly accessible on the web.
The best part: you only pay when a URL actually gets indexed. If Google doesn't index it within 14 days, the credit is automatically returned to your account.
Step 1 - Create Your Account
Head to easyindexer.com and click Get Started in the top right corner.

Fill in your name, email address, and a password. That's it - no credit card required to sign up. You get 5 free credits to try the service before paying anything.
Once you're in, you'll land on the dashboard. This is your home base for everything.
Step 2 - Understanding the Dashboard
The dashboard has two main sections:
Left side - Submit URLs This is where you paste the URLs you want to index and hit submit.
Right side - Recent Projects & URL History This shows you what you've submitted and what the current status of each URL is.
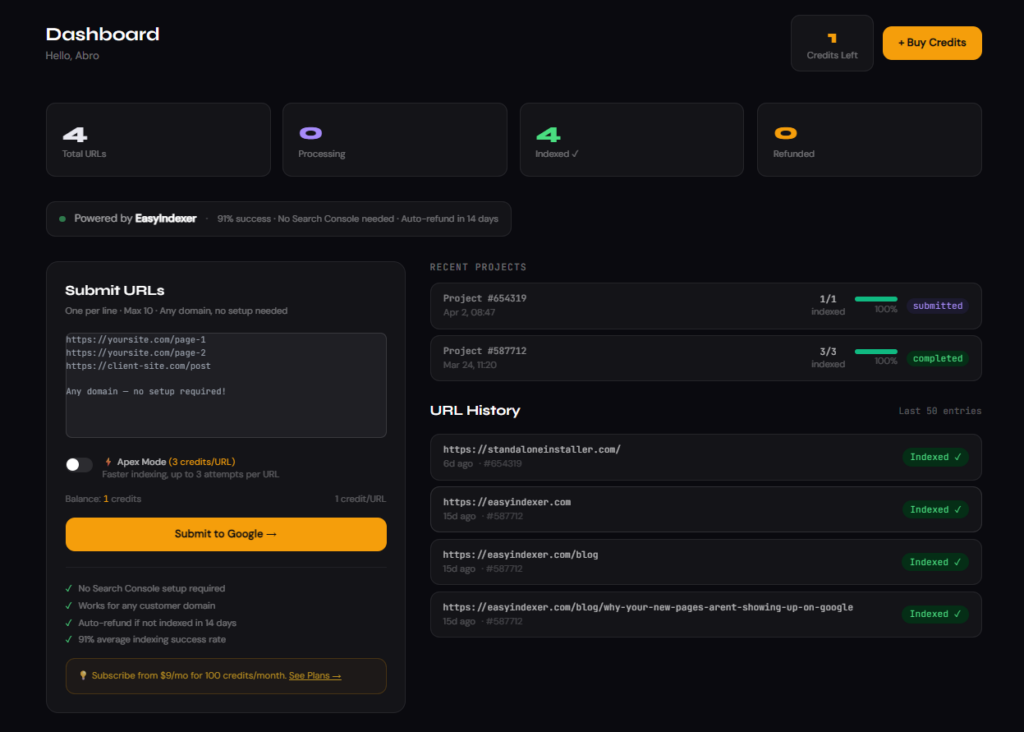
At the top you'll see four stat cards:
- Total URLs - how many URLs you've submitted overall
- Processing - URLs currently being indexed by Google
- Indexed ✓ - URLs Google has confirmed indexed
- Refunded - URLs that weren't indexed (credits returned to you)
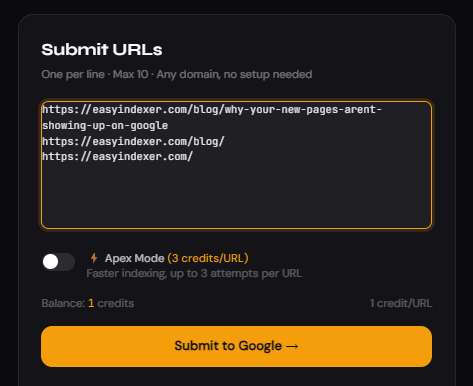
Step 3 - Submit Your First URL
This is the core feature of EasyIndexer as a submit URL to search engine tool.
In the Submit URLs box on the left, paste the URLs you want to index - one per line. You can submit up to 10 URLs at a time from the dashboard.
What URLs should you submit?
- New blog posts or pages you've just published
- Product pages on your e-commerce store
- Backlinks you've built on other websites
- Guest posts, press releases, directory listings
- Any URL you want Google to find faster
Once you've pasted your URLs, click Submit to Google →
That's it. EasyIndexer takes over from here. Your URLs are sent to our indexing infrastructure which signals Google to crawl them, usually within a few hours.
Step 4 - Apex Mode (Optional)
You'll notice an Apex Mode toggle below the URL input.
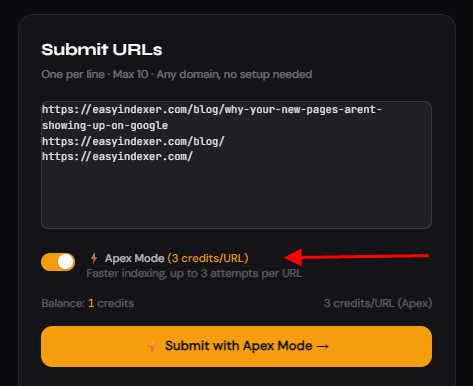
Apex Mode costs 3 credits per URL instead of 1, but gives your URLs up to 3 separate indexing attempts. This is useful when:
- You're dealing with URLs that are harder to get indexed
- You're indexing backlinks on lower-authority sites
- You need results faster and don't want to wait for the first attempt
For most standard pages on established sites, regular mode works fine. For backlinks and challenging URLs, Apex Mode is worth it.
Step 5 - Check Your URL Status
After submitting, your URLs will appear in the URL History section on the right side of the dashboard. Each URL has a status badge:
| Status | Meaning |
|---|---|
| Processing | Submitted to our indexing system, Google is being signalled |
| Indexed ✓ | Google has crawled and indexed this URL |
| Not Indexed | Google didn't index it - credit automatically refunded |
| Refunded | Credit returned to your account |
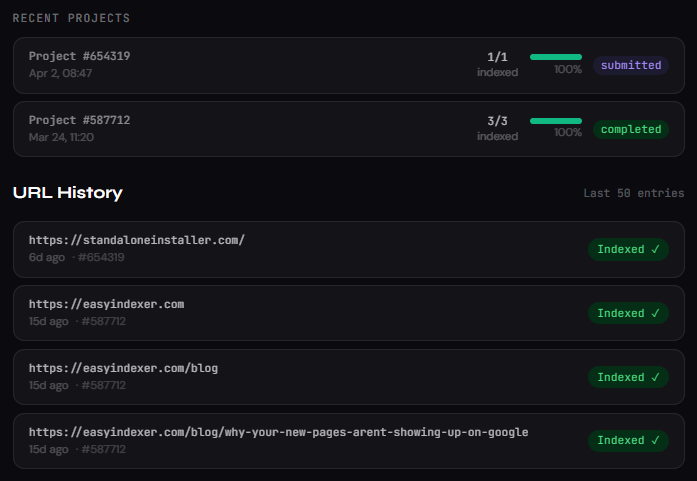
Google typically crawls submitted URLs within a few hours. The preliminary indexing report is available after 4 days, and the final report is confirmed after 14 days.
If a URL remains unindexed after 14 days, the credit is automatically returned - no need to contact support.
Step 6 - Buy Credits (When You Need More)
Your 5 free credits will run out quickly once you start using EasyIndexer properly. Head to Billing in the navigation to top up.
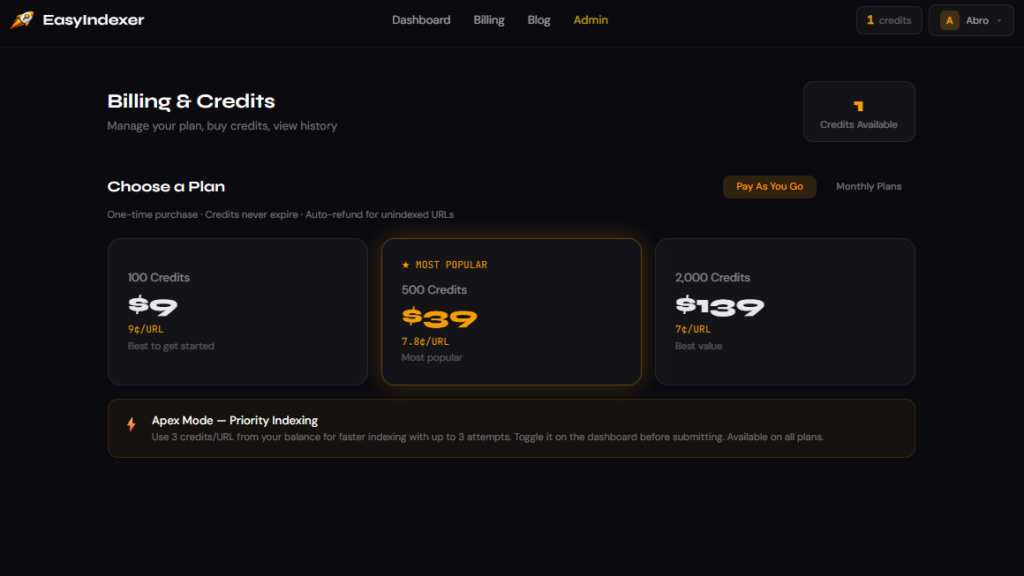
EasyIndexer offers two ways to buy credits:
Pay As You Go - best for occasional use:
- 100 credits - $9 (9¢/URL)
- 500 credits - $39 (7.8¢/URL)
- 2,000 credits - $139 (7¢/URL)
Monthly Subscriptions - best for regular use:
- Starter - 150 credits/month for $15
- Pro - 600 credits/month for $45
- Agency - 2,500 credits/month for $149
Subscriptions give you more credits per dollar and refill automatically each month. If you're submitting URLs regularly - especially backlinks - the Pro or Agency plan saves you money.
Step 7 - Use the API (Pro & Agency)
If you're on a Pro or Agency plan, you get access to the EasyIndexer API. This lets you automate URL submissions from your own tools, scripts, or workflows.
Go to Account → API Access to find your API token and documentation.
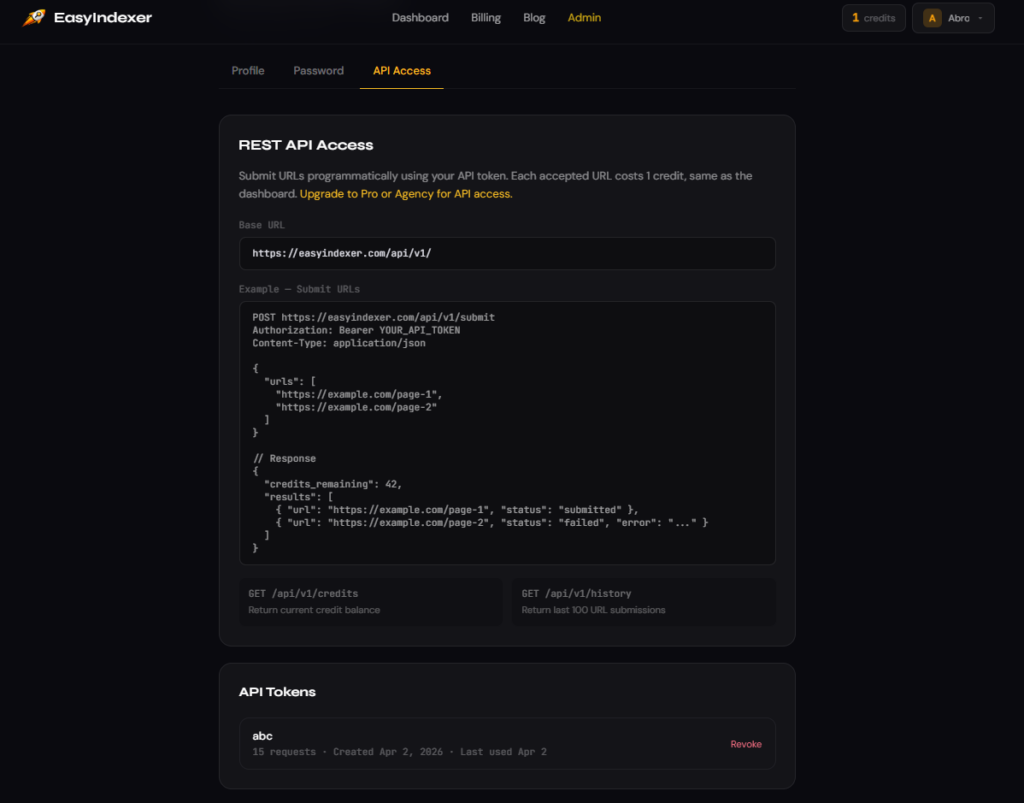
The three API endpoints are:
GET  /api/v1/credits    - check your credit balance
GET  /api/v1/history    - get your last 100 submissions
POST /api/v1/submit     - submit URLs for indexing
A basic submission looks like this:
curl -X POST https://easyindexer.com/api/v1/submit \
  -H "Authorization: Bearer YOUR_API_TOKEN" \
  -H "Content-Type: application/json" \
  -d '{"urls": ["https://yoursite.com/new-page"]}'
This makes EasyIndexer a powerful easy indexer integration for any SEO workflow - you can automatically submit new pages as you publish them.
Step 8 - Use the Chrome Extension
Don't want to open the dashboard every time? Install the EasyIndexer Chrome Extension.
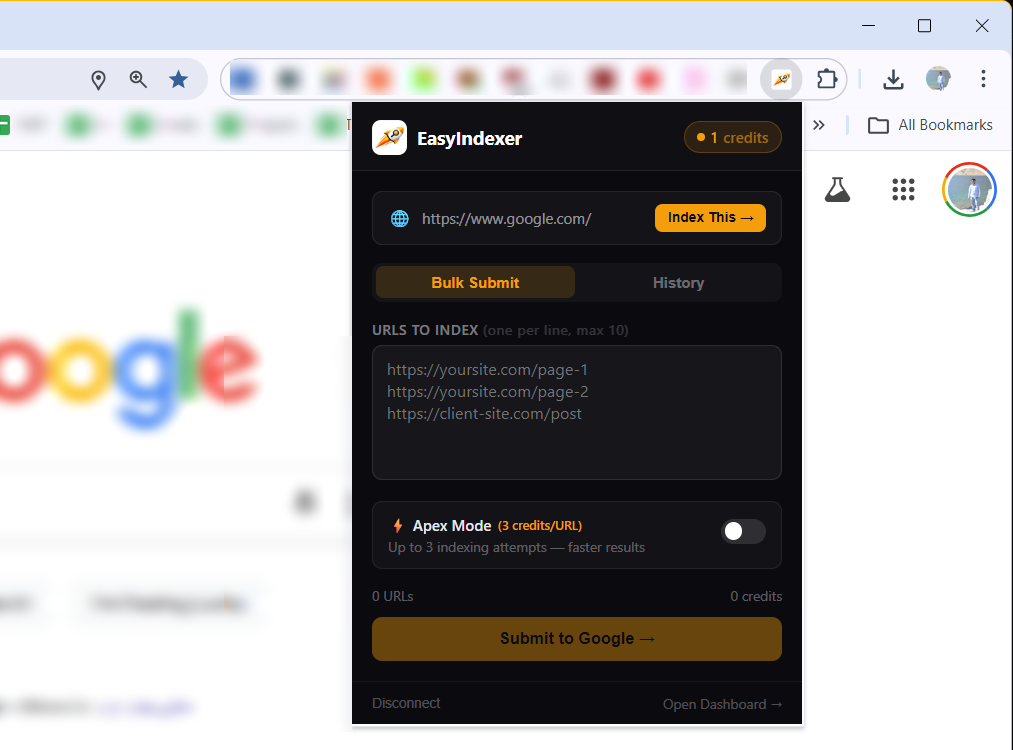
Once installed, you can:
- Click the extension icon on any page to index it instantly
- Paste up to 10 URLs into the bulk submit field
- Check your credit balance without opening the dashboard
- See your recent submission history
Get it from the Chrome Web Store by searching EasyIndexer.
Step 9 - Bulk Upload (Pro & Agency)
If you're on Pro or Agency plan, you can submit hundreds of URLs at once using the Bulk Upload feature.
Go to Bulk Upload in the nav menu and upload a .csv file with one URL per row.
This is perfect for:
- Indexing your entire backlink profile at once
- Submitting a new site launch with hundreds of pages
- Re-indexing pages after a site migration
- Submitting large batches of press releases or directory listings
Tips for Getting the Best Results
Here are some things that help EasyIndexer work better for you:
Make sure the URL is crawlable Before submitting, confirm the page is publicly accessible and doesn't have a noindex tag. EasyIndexer can get Google to crawl the page, but if the page blocks indexing, Google won't index it.
Submit internal links too When you submit a new blog post, also submit a few of the internal links pointing to it. This helps Google understand the page's context faster.
Use it for backlinks immediately Don't wait to index your backlinks. Submit them the same day you get them. The sooner Google crawls the page, the sooner the link starts passing value to your site.
Don't submit the same URL repeatedly If a URL is already in your Processing or Indexed list, submitting it again won't speed things up. Wait for the 14-day window before resubmitting a URL that came back as Not Indexed.
Frequently Asked Questions
Does EasyIndexer work for any website? Yes. Unlike Google Search Console, EasyIndexer doesn't require you to own or verify the website. You can submit any publicly accessible URL - your own pages, backlinks on other sites, anything.
How long does indexing take? Google typically crawls submitted URLs within a few hours. The official preliminary report is available at 4 days, and the final report at 14 days. In practice many URLs show as indexed within 24–48 hours.
What happens if my URL doesn't get indexed? After 14 days, any URL that Google hasn't indexed has its credit automatically refunded to your account. You don't need to do anything - it's handled for you.
Is it safe? Yes. EasyIndexer uses white-hat methods only. There are no spammy links or black-hat techniques involved. It simply signals Google's crawlers to visit your pages - the same way Search Console does, just faster and without the ownership requirement.
Can I use it for tier 2 and tier 3 backlinks? Absolutely. This is one of the most popular use cases. Link builders use EasyIndexer to index their entire backlink pyramid - tier 1 money links, tier 2 support links, and tier 3 amplification links.
Summary
Getting your URLs indexed quickly is no longer something you have to leave to chance. EasyIndexer gives you a direct line to Google's crawlers - whether you're publishing new content, building backlinks, or managing client SEO campaigns.
Here's the full process in one place:
- Create your account at easyindexer.com
- Paste your URLs into the Submit form
- Toggle Apex Mode on for harder-to-index URLs
- Check URL History to track status
- Get automatic credit refunds for anything Google doesn't index
If you're serious about SEO, you can't afford to wait weeks for Google to find your pages. Every day a backlink isn't indexed is a day it's not helping your rankings.
Start indexing your URLs now → Get 5 free credits at easyindexer.com
Have a question about EasyIndexer or a specific use case you want covered? Drop a comment below or reach out - we read everything.